Показаны сообщения с ярлыком exam. Показать все сообщения

воскресенье, 29 марта 2015 г.

Экзамен PMP - план подготовки и симуляторы

Пути для сдачи экзамена PMP - Project Management Professional - возможны разные.


 Один из них такой:

  1. Зарегистрироваться на сайте PMI.
  2. Оплатить членский взнос 129$.
  3. Заработать 35 PDU - pmstudy.com - 140$
  4. Подать заявку на сдачу PMP.
  5. Оплатить сертификацию 405$.
  6. Прочесть PMBoK один раз.
  7. Прочесть Rita PMP Exam prep первый раз.
  8. Пройти тесты Rita Fast Track до тех пор, пока результат не превысит 75%.
  9. Назначить дату сдачи в тестовом центре Prometric.
  10. Просмотреть Rita PMP Exam prep второй раз.
  11. Пройти еще как минимум 2 посторонних теста - PMP Exam Free – Oliver Lehmann.
  12. Просмотреть Rita PMP Exam prep.
  13. Просмотреть PMBoK.
  14. Приехать в тестовый центр и сдать экзамен.

вторник, 2 сентября 2014 г.

Образовательные он-лайн ресурсы

Хорошая подборка образовательных он-лайн ресурсов -
http://habrahabr.ru/company/mailru/blog/235165/
Много бесплатных.
  • Универсариум
  • Сетевая академия Cisco
  • Виртуальная академия Microsoft
  • Московский государственный университет экономики, статистики и информатики (МЭСИ)
  • Бизнес-школа информационных технологий РФЭИ
  • ИНТУИТ
  • Центр компьютерного обучения «Специалист»
  • Московский центр дистанционного образования
  • Hexlet
  • Lendwings
  • Coursera
  • Udacity
  • Бесплатные материалы Массачусетского Технологического Института
  • Бесплатные курсы Стэнфордского Университета
  • Онлайн-курсы Гарвардского Университета
  • Видео-лекции Университета Беркли

Еще: http://habrahabr.ru/company/mailru/blog/215487/ - большая подборка он-лайн курсов для веб-дизайнеров и веб-разработчиков.

https://www.class-central.com - агрегатор он-лайн курсов.

четверг, 16 августа 2012 г.

среда, 15 сентября 2010 г.

ITIL v3 - обзор концепции

ITIL - IT Infrastructure Library, библиотека инфраструктуры информационных технологий — библиотека, описывающая лучшие из применяемых на практике способов организации работы подразделений или компаний, занимающихся предоставлением услуг в области информационных технологий.

Источники информации:
http://www.itil.org/en/vomkennen/itil/index.php
http://www.itsmforum.ru/

Стандарт разработан около 20 лет назад организацией CCTA, нынешней OGC (Office of Governance Commerce) в Norwich (England), разработка осуществлялась под контролем британского правительства. Сейчас формально библиотека принадлежит королевскому дому Англии, в частности — нынешней королеве.

В конечном счёте, все процессы ITIL работают на повышение конкурентоспособности, а в наше время даже внутренние ИТ-подразделения компаний не могут чувствовать себя в абсолютной безопасности, так как вынуждены конкурировать с аутсорсинговыми компаниями.


В начале лета 2007 года был опубликована актуальная сейчас 3-я версия стандарта ITIL.

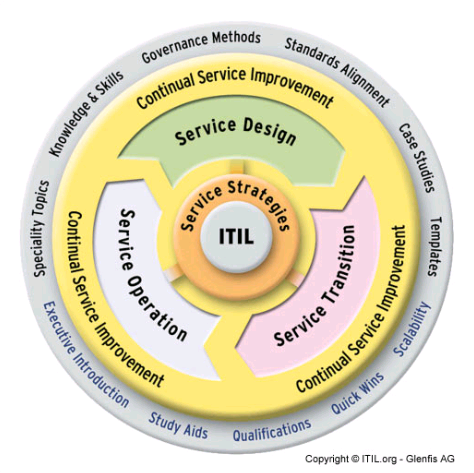
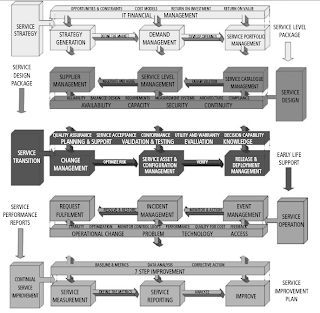
Группу основных материалов стандарта формируют 5 руководств, которые формируют модель жизненного цикла сервиса:
  1. Service Strategy - Стратегия услуг
  2. Service Design - Проектирование услуг
  3. Service Transition - Преобразование услуг
  4. Service Operation - Эксплуатация услуг
  5. Continual Service Improvement - Постоянное улучшение услуг
Ключевым понятием стандарта является услуга (сервис):
  • A means of delivering value to Customers by facilitating Outcomes Customers want to achieve without the ownership of specific Costs and Risks.
  • Способ предоставления ценности Заказчикам через содействие им в получении Выходов (результатов на выходе), которых Заказчики хотят достичь без владения специфическими Затратами и Рисками.
Допускается использование для термина "Услуга" вариант перевода "Сервис", однако данный вариант не рекомендуется к использованию.

Service Strategy - Стратегия услуг

Стратегия услуг определяет всеобщую Стратегию для ИТ-услуг и для Управления ИТ-
услугами.

Позволяет получить ясное понимание по следующим вопросам:
  • какие услуги должны предлагаться
  • кому должны предлагаться услуги
  • как должна быть подготовлена внутренняя и внешняя рыночная площадка
  • существующая и потенциальная конкуренция на этих площадках и конечные цели, которые позволят выделять ценности приносимые вашими услугами
  • как заказчики и спонсоры будут воспринимать и оценивать получаемые ценности, и как это ценности будут создаваться
  • как заказчики будут выбирать источник услуг в соответствии с использованием разных видов поставщиков услуг
  • как прозрачность и управление созданием ценностей будет достигнуто в финансовом управлении
  • как будут создаваться внятные бизнес-примеры для защиты стратегических инвестиций в активы услуг и управляемость услуг
  • как будет отрегулировано выделение доступных ресурсов для оптимального эффекта всему портфелю услуг
  • как будет измерено выполнение услуг.
Четыре "П" Стратегии:
  • Перспектива: характерное видение и направление
  • Позиция: основа, на которую провайдер услуги опирается вступая в конкурентную борьбу
  • План: как провайдер собирается достигать своих целей
  • Профиль: фундаментальный путь ведения бизнеса - характерный профиль в принятии решений и действиях.
Конкуренция и рыночные условия: каждый поставщик услуг подвержен влиянию конкуренции.


Ценность услуги: определяется в терминах бизнес-результатов, получаемых клиентом, и описывается сочетанием двух компонентов:
  • Service Utility, Полезность Услуги: то, что клиент получает с точки зрения поддержки результатов и/или удаления ограничений.
  • Service Warranty, Гарантии Услуги: как услуга поставляется и его пригодность для использования, с точки зрения доступности, пропускной способности, непрерывности и безопасности.
Типы поставщиков услуг:
  • Тип I: существует внутри организации исключительно для доставки услуг одной конкретной бизнес-единице
  • Тип II: обслуживает несколько подразделений в одной организации
  • Тип III: функционирует как внешний поставщик услуг, обслуживающий различных внешних клиентов.
Управление услугами как стратегический актив:
  • Возможности: способность поставщика (в плане управления, организации, процессов, знаний и людей) для координации, управления и распределения ресурсов
  • Ресурсы: прямые входы для производства услуг, например, финансовых, средств производства, инфраструктурных, приложений, информационных и людских.
Критические факторы успеха (Critical Success Factors (CSFs)). Сервис-ориентированный финансовый учет.

Модели предоставления услуг:

  • Managed Service, Управляемая Услуга: где подразделение, требующее услугу, полностью финансирует эту услугу для себя.
  • Shared Service, Общая услуга: предоставление множества услуг одной или нескольким бизнес-единицам с использованием общей инфраструктуру и ресурсов.
  • Utility, Утилита: услуги предоставляются на основе того, сколько требуется по каждому клиенту, как часто и в какое время клиент нуждается в них.
Проектирование и развитие организации: обеспечение текущего состояния и структуры организации поставщика услуг, которое обеспечивает реализацию Стратегии услуг. Включает в себя следующие компоненты:

Этапы развития организации: предоставление услуг через сеть, направление, делегирование, координация или сотрудничество в зависимости от уровня развития организации
Стратегия источников услуг: принятие обоснованных решений по выбору поставщиков услуг с точки зрения внутренних услуг, общих услуг, полного комплекса услуг аутсорсинга, премьер-консорциума или селективного аутсорсинга.
Аналитика Услуг
: использование технологий, чтобы помочь достичь понимания производительности Услуг путем анализа
Интерфейсы Услуг: механизмы, с помощью которых пользователи и другие процессы взаимодействия с каждыми Услугами
Управление рисками: фиксация и управление портфелем рисков, лежащих в основе портфеля услуг.

Финансовый менеджмент. Управление портфелем услуг ( Service Portfolio Management (SPM)). Управление спросом.

Service Design - Проектирование услуг

Деятельность или Процесс, который идентифицирует Требования и далее определяет решение, способное удовлетворить эти Требования.

Проектирование соответствующих и инновационных ИТ-услуг, включая их архитектуру, процессы, политики и документацию, для удовлетворения текущих и будущих согласованных бизнес-требований.

Проектирование услуг включает в себя ряд Процессов и Функций.

Основными целями и задачами Проектирования услуг являются:
  • дизайнерские услуги для достижения согласованных бизнес-результатов
  • проектирование процессов для поддержки жизненного цикла сервисов
  • выявление и управление рисками
  • проектирование безопасной и устойчивой ИТ-инфраструктуры, окружения, приложений и данных / информации, ресурсов и возможностей
  • проектирование методов измерения и метрик
  • создавать и поддерживать планы, процессы, политики, стандарты, архитектуры, структуры и документы, подтверждающие разработку качественных ИТ-решений
  • развитие навыков и возможностей в рамках ИТ-отдела
  • способствовать общему улучшению качества ИТ-услуг.
Есть 5 отдельных аспектов Проектирования услуг:
  • новые или измененные решения для Услуг
  • системы управления услугами и инструменты, особенно Портфель Услуг
  • архитектуры технологий и системы управления
  • процессы, роли и возможности
  • методы измерения и показатели.
Четыре Ps проектирования:
  • люди: люди, навыки и компетенции, участвующие в предоставлении ИТ-услуг
  • продукты: технологии и системы управления, используемые в поставках ИТ-услуг
  • процессы: процессы, роли и деятельности, участвующие в предоставлении ИТ-услуг
  • партнеры: производители и поставщики, используемые при предоставлении ИТ-услуг.
Проектная документация услуги (Service Design Package (SDP)): определяет все аспекты ИТ-услуг и их требований на каждой стадии жизненного цикла. SDP производится для
каждой новой ИТ-услуги, при ее значительном изм
енении, или выведения из эксплуатации.

Управление Каталогом услуги (SCM). Управление уровнем услуг (SLM).

Основной информацией, представляемой процессом SLM
, включает Соглашение об уровне услуг (SLA), Соглашение операционного уровня (OLA) и другие соглашения о поддержке, а также производство Плана улучшения услуг (SIP) и Плана качества услуг.

Информационная система управления мощностями (CMIS) является краеугольным камнем
успешного процесса Управления мощностями.

Управление доступностью.
  • проактивная деятельность: активное планирование, проектирование, рекомендации и улучшение доступности.
  • реактивная деятельность: мониторинг, оценка, анализ и управление событиями, инцидентами и проблемами, связанными с недоступностью услугиУправление мощностями.
Управление непрерывностью ИТ-услуг (IT Service Continuity Management (ITSCM))

Поскольку технология является одним из основных компонентов большинства бизнес-процессов, непрерывность или высокая доступность ИТ имеет решающее значение для выживания бизнеса в целом.

Управление информационной безопасностью (Information Security Management (ISM))

Целью процесса ISM является согласование ИТ-безопасности с безопасностью бизнеса
и обеспечение эффективного управление информационной безопасности во всех Услугах и активностях по управлению Услугами так, чтобы:
  • информацию можно получить и использовать при необходимости (наличие)
  • информацию можно получить или раскрыть только тем, кто имеют право (конфиденциальность)
  • информация является полной, точной и защищенной от несанкционированного изменения (целостность)
  • бизнес-операциям, а также обмену информации, можно доверять (подлинность и безотказность).
Управление поставщиками

База данных о поставщиках и договорах (SCD) является жизненно важным источником информации о поставщиках и контрактах, и должна содержать все сведения, необходимые для управление поставщиками, контрактами и связанными с ними услугами.

Service Transition - Преобразование услуг

Роль Преобразования услуг заключается в переводе услуг, которые необходимы
Бизнесу, в оперативное использование.

Преобразование услуг поддерживается основными принципами, которые способствуют эффективному и результативному использованию новых / измененных услуг. Ключевые принципы включают в себя:

  • Понимание всех услуг, их полезности и гарантии - для преобразования Услуги важно знать ее характер и цели с точки зрения результатов и/или удаления бизнес-препятствий (утилитарность) и гарантии того, что полезности будут осуществляться (гарантии).
  • Создание официальной политики и общей основы для реализации всех необходимых изменений - согласованность и полнота обеспечивает отсутствие потерь Услуг, спонсоров и сбоев в Услугах.
  • Поддержка передачи знаний, поддержки принятия решений и повторное использование процессов, систем и других элементов - эффективное Преобразование услуг обеспечивается с участием всех заинтересованных сторон, с обеспечением соответствующих знаний и доступа и условия, что работа может быть повторно использована в будущем при аналогичных обстоятельствах.
  • Прогнозирования и управление "корректировкой курса" - быть активным и определять вероятные потребности коррекции курса и, когда элементы Услуги должны быть скорректированы, это осуществляется логически и полностью документировано.
  • Обеспечение участия Преобразования услуг и требований Преобразования услуг во всем жизненном цикле услуг.

Управление изменениями.

Изменением Услуги является изменение или удаление уполномоченной, запланированной или поддерживаемой Услуги или компонентов Услуги и связанной с ней документации.

Управление активами Услуги и конфигурацией (SACM).

Для управления большими и сложными ИТ-услугами и инфраструктурами, SACM требует использования системы, известной как Управление конфигурациями (CMS).

Управление знаниями.

Цель управления знаниями заключается в обеспечении определенного сотрудника определенными знаниями, в нужное время для обеспечения и поддержки Услуг, требуемых бизнесом. Это обеспечивает:
  • более эффективные услуги с улучшенным качеством
  • четкое общее понимание ценности предоставляемых услуг
  • соответствующую информацию, которая всегда доступна.
Планирование перехода и поддержки.
Целями планирования перехода и поддержки являются:
  • планировать и координировать ресурсы для обеспечения требований Стратегии услуг, определенных при Проектировании услуг, эффективно реализуются в эксплуатации услуг
  • идентифицировать, управлять и управлять рисками ошибок и нарушений при деятельности по преобразованию.
Управление релизами и развертыванием. Подтверждение и тестирование услуг. Оценки.

Service Operation - Эксплуатация услуг


Ежедневное управление ИТ- услугой, Системой или другими Конфигурационными единицами.

The purpose of Service Operation is to deliver agreed levels of service to users and customers, and to manage the applications, technology and infrastructure that support delivery of the services.

It is important for Service Operation to balance conflicting goals:
  • internal IT view versus external business view
  • stability versus responsiveness
  • quality of service versus cost of service
  • reactive versus proactive activities.
Event Management Process.

An event is a change of state that has significance for the management of a configuration item or IT service.

Incident Management Process.

An incident is an unplanned interruption to an IT service, or a reduction in the quality of an IT service. Failure of a configuration item that has not yet impacted service is also an
incident.

Request Fulfillment Process.

A service request is a request from a user for information or advice, or for a standard change, or for access to an IT service.

Access Management Process.

Problem Management Process.
A problem is a cause of one or more incidents. The cause is not usually known at the time a problem record is created, and the problem management process is responsible for further
investigation.

Common Service Operation Activities.
Service Operation includes a number of activities that are not part of the five processes described. These include:
  • monitoring and control: to detect the status of services and CIs and take appropriate corrective action
  • console management/operations bridge: a central coordination point for monitoring and managing services
  • management of the infrastructure: storage, databases, middleware, directory services, facilities/data centre etc.
  • operational aspects of processes from other lifecycle stages: Change, Configuration, Release and Deployment, Availability, Capacity, Knowledge, Service Continuity Management etc.
Service Desk Function
The Service Desk provides a single central point of contact for all users of IT. The Service Desk usually logs and manages all incidents, service requests and access requests and provides an interface for all other Service Operation processes and activities.

Technical Management Function.
Technical Management includes all the people who provide technical expertise and management of the IT infrastructure.

Application Management Function.
Application Management includes all the people who provide technical expertise and management of applications. As such they carry out a very similar role to Technical Management, but with a focus on software applications rather than infrastructure.

IT Operations Management Function.
IT Operations Management is responsible for the management and maintenance of the IT infrastructure required to deliver the agreed level of IT services to the business.

Continual Service Improvement - Постоянное улучшение услуг

Постоянное улучшение услуг отвечает за управление улучшениями (совершенствованием) в Процессах Управления ИТ-услугами и предоставлении ИТ-услуг. Производительность
Поставщика ИТ-услуг постоянно измеряется, и разрабатываются меры по улучшению Процессов, ИТ-услуг и ИТ-инфраструктуры с целью увеличения Эффективности, Результативности и Эффективности затрат.

Continual Service Improvement (CSI) is concerned with maintaining value for customers through the continual evaluation and improvement of the quality of services and the overall maturity of the ITSM service lifecycle and underlying processes.

7-Step Improvement Process.
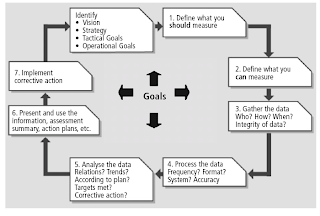

The 7-step improvement process covers the steps required to collect meaningful
data, analyze this data to identify trends and issues, present the information to
management for their prioritization and agreement, and implement
improvements.
  • Step 1 - Define what you should measure
  • Step 2 - Define what you can measure
  • Step 3 - Gather the data
  • Step 4 - Process the data
  • Step 5 - Analyze the data
  • Step 6 - Present and use the Information
  • Step 7 - Implement corrective action
Service Measurement
There are four basic reasons to monitor and measure, to:
  • validate previous decisions that have been made
  • direct activities in order to meet set targets - this is the most prevalent reason for monitoring and measuring
  • justify that a course of action is required, with factual evidence or proof
  • intervene at the appropriate point and take corrective action.
There are three types of metrics that an organization needs to collect to support
CSI activities as well as other process activities.
  • Technology metrics: often associated with component and applicationbased metrics such as performance, availability.
  • Process metrics: captured in the form of Critical Success Factors (CSFs), Key Performance Indicators (KPIs) and activity metrics.
  • Service metrics: the results of the end-to-end service.
Component/technology metrics are used to compute the service metrics.

Service Reporting.
понедельник, 28 июня 2010 г.

LPI 102 - подготовка к экзамену. Заметки.

При подготовке к экзамену 117-102 из серии Junior Level Linux Professional (LPIC-1) были сделаны следующие заметки.

  1. Изменить срок действия пароля можно при помощи команд usermod, passwd, chage.
  2. Утилита tcpd использует файл hosts.allow для управления доступом к сервисам системы.
  3. Экранная клавиатура называется GOK.
  4. Для отображения кода выхода после выполнения последней команды echo $?.
  5. Для добавления шлюза по умолчанию route add default gw 192.168.1.1.
  6. Записи в /etc/hosts должны быть вида 127.0.0.1 localhost.localdomain localhost
  7. Для остановки сервера печати CUPS c отключением всех заданий на печать с сообщением "hello" надо задать команду cupsdisable -c -r hello HPLaserjet4
  8. Для коррекции аппаратных часов следует задать команду hwclock --hctosys --localtime.
  9. В локали не содержится настройка временной зоны
  10. В crontab записи должны заканчиваться символом новой строки.
  11. Утилита для чтения текста на экране с текстовым интерфейсом управления emacspeak
  12. Утилита для применения изменений к существующему ядру в файл diff - patch

  13. Для корректного рестарта Apache рекомендуется использовать команду apachectl graceful
  14. В файле smb.conf для отключения аутентификации при доступе к папке следует указать параметр security=share.
  15. Для трансформации файла паролей shadow в формат md5-совместимости следует выполнить команду pwconv.
  16. Для получения вновь адреса IP по dhcp можно использовать утилиты dhclient, pump, dhcpcd.
  17. Для временного удаления переменной окружения для определенного скрипта следует запустить команду env -u foobar myscript
  18. Команды для загрузки модулей ядра modprobe, insmod
  19. Для ознакомления с параметрами, которые могут быть использованы с модулем ядра, надо использовать команду modinfo -p
  20. depmod создает файл связей модулей modules.dep. Для перестроения этого файла используют команду depmod -a.
  21. Информация по теме Linux содержится на сайтах lwn.net, linux today, newsforge
  22. logrotate создает новые логи и удаляет старые
  23. 00 18-07 **1-5 logout-users - скрипт каждый час отключающий пользователей с 18-7 часов, с пн по пт.
  24. restore восстанавливает бекап, сделанный при помощи команды dump
  25. export PS2="[\u\w]\\$" меняет второе приглашение на имя пользователя и рабочую директорию
  26. Разрешения: для файла /etc/passwd -wr-r--r--, для файла /etc/shadow --r-------
  27. atrm удаляет приостановленные задачи at
  28. в файле /etc/protocol записи должны быть вида udp 17 UDP
  29. При использовании файлов /etc/ppp/peers/* файл /etc/ppp/options должен быть пустой
  30. В файле /etc/nsswitch.conf должны быть записи вида hosts: files, dns
  31. В файле /etc/host.conf записи должны быть вида order: hosts, bind
  32. В файле /etc/services записи должны быть вида tftp 69/udp
  33. Для разрешения доступа root к папке nfs следует прописать разрешение no_root_squash
  34. Для доступа к удаленному хосту при помощи сгенерированного DSA-ключа надо разместить этот ключ в директории $HOME/.ssh/authorized_keys на удаленном хосте и в директории $HOME/.ssh/id_dsa на локальном хосте.
  35. Настройки для исходящих соединений по ssh следует делать в файле /etc/ssh/ssh_conf
  36. wins и nmbd разрешают имена wins в ip адрес.
  37. Конфигурационные файлы samba /etc/smb.conf и /etc/samba/smb.conf
  38. smbstatus показывает соединения к серверу samba
  39. smbadduser привязывает пользователей windows к пользователям linux
  40. crtsct - параметр аппаратного контроля потока для демона PPP
  41. Для запрета соединения root через ssh следует указать PermitRootLogin No
  42. telinit 1 переводит систему в однопользовательский режим
  43. для изменения или отключения комбинации alt-ctrl-del следует изменить файл /etc/inittab
  44. "." @foobar отсылает все системные сообщения на сервер foobar
  45. Поменять ассоциацию желаемой программы с определенным видом файлов можно в файле .bashrc
  46. /etc/profile содержит переменные для всех пользователей
  47. lpadmin используется для администрирования CUPS
  48. В директории /var/spool/mail содержится доставленная почта для определенных пользователей
  49. /etc/hosts и /etc/nsswitch.conf это файлы связанные с разрешением имен
  50. Для временного запрета пользователю на соединение с системой следует изменить его оболочку на /etc/false
  51. /etc/issue.net содержит текст приветствия для пользователей, соединяющихся по telnet
  52. На страницах man содержится информация о программных библиотеках, командах суперпользователей, конфигурационные команды.
  53. В файле /etc/hosts содержатся записи типа 192.168.0.1 dns-server
  54. FontPath "Server/:7000" означает что шрифты загружаются с сервера
  55. Тема рабочего стола изменяется в файле /etc/X11/xdm/Xsetup для менеджера XDM
  56. Приветствие в Гноме меняется в файле /etc/X11/gdm/init/Default
  57. Для перевода системы на временной пояс UTC следует выполнить команду
    ln -s /usr/share/zoneinfo/UTC /etc/localtime
  58. Шары NFS конфигурируются через файл /etc/exports
  59. Список компьютеров для соединения с сервером печати расположен в файле /etc/hosts.lpd
  60. all-squash в файле fstab приравнивает всех подключающихся к файловой системе к анонимным пользователям
  61. DocumentRoot - директива Apache для указания на адрес корневой папки http файлов.
  62. Для отключения сервиса telnet надо закомментировать его настройку в файле /etc/httpd.conf
  63. /etc/aliases - в этом файле Sendmail держит списки почтовых алиасов.
  64. Для конфигурирования Apache используются файлы httpd.conf и srm.conf
  65. Для закрытия релея в Sendmail следует сконфигурировать файл /etc/sendmail.cf
  66. /product company (r,w) - означает что файловая система /product будет эскпортирована в NFS для монтирования к серверу company
  67. lsmod выдает информацию в формате "название, размер, использованные счетчики, список ссылающихся модулей"
  68. lsmod выдает информацию аналогичную той, что находится в фале /proc/modules. В этом файле находится список загруженных модулей.
  69. Для выгрузки загружаемого модуля из ядра используют утилиту rmmod
  70. make oldconfig собирает ядро из старых конфигурационных файлов.
  71. /usr/share/doc содержит файлы документации, сгенерированные устанавливаемыми программами
  72. доступные функции можно посмотреть при помощи команды declare -f
  73. AuthUserFile /etc/apache2/users и AuthName используются в конфигурации Apache для активации аутентификации
  74. /etc/ssh_host_key должно быть доступно для прочтения пользователям SSH
  75. информацию о сроке активности учетной записи в файле /etc/shadow лучше всего менять утилитой chage
  76. В файле crontab существует 5 полей для определения времени запуска задания.
  77. Сообщения от ядра содержатся в файлах /var/log/boot.log и /var/log/dmesg
  78. Файл с приветствием пользователей при локальном заходе - /etc/issue
  79. local2.* /dev/console показывает все сообщения от демона ppp с меткой local2
  80. make menuconfig позволяет конфигурировать ядро в системе меню
  81. ServerRoot определяет корневую директорию в которой работает Apache
  82. local-host-names определяет имена машин для Sendmail.
  83. make dep проверяет зависимости после конфигурирования ядра системы
  84. /var/spool/lpd директория в которой находится очередь печати
  85. #! в начале файла определяет интерпретатор скрипта
  86. /etc/nologin - запрещает логин пользователей
  87. bash -r | rbash - вход в ограниченный режим
  88. bind определяет в конфигурации xinetd порт, с которого будет работать ПО
  89. [.]* определяет все файлы или директории с именем, начинающимся с точки
  90. /etc/at.deny запрещает запуск заданий пользователям при помощи at или batch
  91. /etc/cups/cupsd.conf содержит конфигурацию сервера печати
  92. --edit-key переводит в меню конфигурирования gpg
  93. xwininfo -metric позволяет определить геометрию окна в Linux
  94. route del default удаляет шлюз по-умолчанию из таблицы маршрутизации
  95. logger генерирует логи с заданными метками
  96. tar -tf /dev/st0 проверяет ленту с записью резервной копии
  97. /var/log/wtmp хранит историю команд
  98. /etc/exports содержит список директорий nfs
  99. apachectl configtest - проверяет правильность конфига Apache
  100. newaliases создает алиасы к почтовому ящику и перестраивает базу алиасов в файле /etc/aliases
  101. portmap - сервис назначающий порты другим сервисам
  102. exportfs применяет измнения, сделанные в конфигурации NFS
  103. lpr - команда для отсылки на печать данных из командной строки
  104. /etc/ppp/pap-secrets файл должен иметь права на чтение только для root
  105. lpr -l обходит фильтры сервера печати
  106. /etc/printcap файл с конфигурациями очереди печати
  107. 23 0-23/2 *** /myscript - скрипт запускается каждые 23 минуты после полуночи каждые 2 часа
  108. iptables -t nat -L позволяет увидель таблицу трансляции адресов
  109. XF86Config файл содержит секцию Files в которой указывается информация о шрифтах
  110. mkboot --device /dev/fd0 2.4.18-12 создает в Debian загрузочную дискету
  111. lpc topq печатает задание не смотря на его место в очереди на печать
  112. export PATH=$PATH:$APPLICATION обновляет путь директорией application
  113. /boot/module-info содержит параметры для модулей ядра, которые считываются ими при заргузке.

пятница, 16 апреля 2010 г.

LPI exam 102 prep: Shells, scripting, programming, and compiling

Краткие заметки, сделанные при подготовке к сдаче экзамена LPI 117-102 (Junior Level Linux Professional (LPIC-1)).

Shell customization

POSIX is the Portable Operating System Interface for uniX.
Well known shells include the Korn shell (ksh), the C shell (csh) and its derivative tcsh, the Almquist shell (ash) and its Debian derivative (dash).

Shells, including bash, allow you to create and modify shell
variables, which you may export to your environment for use by other processes
running in the shell or by other shells that you may spawn from the current shell.

Table 3. Common bash environment variables
Name Function
USER The name of the logged-in user
UID The numeric user id of the
logged-in user
HOME The user's home directory
PWD The current working directory
SHELL The name of the shell
$ The process id (or PID of the running Bash shell (or other) process)
PPID The process id of the process that started this process (that is, the id of the parent process)
? The exit code of the last command

When you create a shell variable, you will often want to export it to the environment
so it will be available to other processes that you start from this shell. Variables that
you export are not available to a parent shell.

In shells such as the C and tcsh shells, you use the set command to set variables in
your shell, and the setenv command to set and export variables. The syntax differs
slightly from that of the export command.

You remove a variable from the Bash shell using the unset command.

You can use
the -v option to be sure that you are removing a variable definition. Functions can
have the same name as variables, so use the -f if you want to remove a function
definition. Without either -f or -v, the bash unset command removes a variable
definition if it exists; otherwise, it removes a function definition if one exists.

If this shell is bash, then it executes several profile scripts before you get
control. If /etc/profile exists, it is executed first. Depending on your distribution, other
scripts in the /etc tree may also be executed, for example, /etc/bash.bashrc or
/etc/bashrc. Once the system scripts have run, a script in your home directory is run
if it exists. Bash looks for the files ~/.bash_profile, ~/.bash_login, and ~/.profile in that
order. The first one found is executed.

You may force bash to read profiles as if it were a login shell using the --login
option. If you do not want to execute the profiles for a login shell, specify the
--noprofile option. Similarly, if you want to disable execution of the ~/.bashrc file
for an interactive shell, start bash with the --norc option.

The Bash shell allows you to define aliases for commands.

You can also use the alias command to display all the aliases if you use it with no
options or with just the -p option, and you can display the aliases for one or more
names by giving the names as arguments without assignments. Listing 10 shows the
aliases for which and vi.

Sometimes called the "Swiss army knife" of the UNIX and Linux toolbox, sed is an
extremely powerful editing filter that uses regular expressions. You now understand
that the challenge is to strip off the first 8 words and the blanks that follow them from
every line of output that begins with 'd'. You can do it all with sed: select only those
lines you are interested in using the pattern-matching expression /^d/, substituting
a null string for the first eight words using the substitute command
s/^d\([^ ]* *\)\(8\}//. Use the -n option to print only lines that you specify
with the p command


Inside the function, you can refer to the parameters using the bash special variables
in Table 4. You prefix these with a $ symbol to reference them as with other shell
variables.

Shell parameters for functions

0, 1, 2, ... The positional parameters starting from
parameter 0. Parameter 0 refers to the
name of the program that started bash,
or the name of the shell script if the
function is running within a shell script.
See the bash man pages for
information on other possibilities, such
as when bash is started with the -c
parameter. A string enclosed in single
or double quotes will be passed as a
single parameter, and the quotes will
be stripped. In the case of double
quotes, any shell variables such as
$HOME will be expanded before the
function is called. You will need to use
single or double quotes to pass
parameters that contain embedded
blanks or other characters that might
have special meaning to the shell.

* The positional parameters starting from
parameter 1. If the expansion is done
within double quotes, then the
expansion is a single word with the first
character of the interfield separator
(IFS) special variable separating the
parameters or no intervening space if
IFS is null. The default IFS value is a
blank, tab, and newline. If IFS is unset,
then the separator used is a blank, just
as for the default IFS.

@ The positional parameters starting from
parameter 1. If the expansion is done
within double quotes, then each
parameter becomes a single word, so
that "$@" is equivalent to "$1" "$2" ....
If your parameters are likely to contain
embedded blanks, you will want to use
this form.

# The number of parameters, not
including parameter 0.

Shell scripts

test and [
The test builtin command returns 0 (True) or 1 (False) depending on the evaluation
of an expression expr. You can also use square brackets so that test expr and
[ expr ] are equivalent. You can examine the return value by displaying $?; you can
use the return value as you have before with && and ||; or you can test it using the
various conditional constructs that are covered later in this section.

(( and [[
The test command is very powerful, but somewhat unwieldy with its requirement
for escaping and the difference between string and arithmetic comparisons.
Fortunately bash has two other ways of testing that are somewhat more natural for
people who are familiar with C, C++, or Java syntax. The (( )) compound
command evaluates an arithmetic expression and sets the exit status to 1 if the
expression evaluates to 0, or to 0 if the expression evaluates to a non-zero value.
You do not need to escape operators between (( and )). Arithmetic is done on
integers. Division by 0 causes an error, but overflow does not. You may perform the
usual C language arithmetic, logical, and bitwise operations. The let command can
also execute one or more arithmetic expressions. It is usually used to assign values
to arithmetic variables.

If, then, else statements
The bash if command is a compound command that tests the return value of a test
or command ($? and branches based on whether it is True (0) or False (not 0).
Although the tests above returned only 0 or 1 values, commands may return other
values. You will learn more about testing those a little later in this tutorial. The if
command in bash has a then clause containing a list of commands to be executed
if the test or command returns 0. The command also has one or more optional elif
clauses. Each of these optional elif clauses has an additional test and then
clause with an associated list of commands, an optional final else clause, and list of
commands to be executed if neither the original test, nor any of the tests used in the
elif clauses was true. A terminal fi marks the end of the construct.

The Bash shell has a shopt builtin that allows you to set or unset many shell
options. One is nocasematch, which, if set, instructs the shell to ignore case in
string matching.

Loops
Bash and other shells have three looping constructs that are somewhat similar to
those in the C language. Each will execute a list of commands zero or more times.
The list of commands is surrounded by the words do and done, each preceded by a
semicolon.
for
loops come in two flavors. The most common form in shell scripting iterates
over a set of values, executing the command list once for each value. The set
may be empty, in which case the command list is not executed. The other form
is more like a traditional C for loop, using three arithmetic expressions to
control a starting condition, step function, and end condition.
while
loops evaluate a condition each time the loop starts and execute the command
list if the condition is true. If the condition is not initially true, the commands are
never executed.
until
loops execute the command list and evaluate a condition each time the loop
ends. If the condition is true the loop is executed again. Even if the condition is
not initially true, the commands are executed at least once.

суббота, 3 апреля 2010 г.

LPI exam 102 prep: Linux documentation

Краткие заметки, сделанные при подготовке к сдаче экзамена LPI 117-102 (Junior Level Linux Professional (LPIC-1)).

Local documentation

The primary (and traditional) source of documentation is the manual pages, which
you can access using the man command.

Man pages are displayed using a pager, which is usually the less command on
Linux systems.

The common manual sections, with some example contents
are:
1. User commands (env, ls, echo, mkdir, tty)
2. System calls or kernel functions (link, sethostname, mkdir)
3. Library routines (acosh, asctime, btree, locale, XML::Parser)
4. Device-related information (isdn_audio, mouse, tty, zero)
5. File format descriptions (keymaps, motd, wvdial.conf)
6. Games (note that many games are now graphical and have graphical
help outside the man page system)
7. Miscellaneous (arp, boot, regex, unix utf8)
8. System administration (debugfs, fdisk, fsck, mount, renice, rpm)

In addition to the standard manual pages, the Free Software Foundation has created
a number of info files that are processed with the info program.

your system may also have one or more graphical interfaces to manual
pages, such as xman (from the XFree86 Project) and yelp (the Gnome help
browser).

If you know that a topic occurs in a particular section, you can specify the section.
For example, man 4 tty or man 2 mkdir.

An alternative is to use the -a option to
display all applicable manual sections. If you specify -a, you will be prompted after
quitting the page for each section.

Use man less to find out more about / (search forwards), ? (search backwards), and n (repeat last search), among many other commands.

The info command comes from the makers of emacs, so the searching commands
are more like emacs commands. For example, ctrl-s searches forwards and
ctrl-r searches backwards using an incremental search. You can also move
around with the arrow keys, follow links (indicated with a star) using the Enter key,
and quit using q. Use the --vi-keys option with info if you'd prefer similar key
bindings to those used for man.

The whatis command searches man pages for the name you give and displays the name
information from the appropriate manual pages. The apropos command does a
keyword search of manual pages and lists ones containing your keyword

Manual pages may be in many locations on your system. You can determine the
current search path using the manpath command.

Depending on your system, configuration information for the man system is stored in
/etc/man.config or /etc/manpath.confg. Older systems use /etc/man.conf.

You may have noticed that the apropos and whatis commands ran quickly. This is
because they do not actually search the individual manual pages. Rather, they use a
database created by the makewhatis command. This is usually run by the system
either daily or weekly as a cron job.

If you wish to print the page, specify the -t option to format the page for printing
using the groff or troff program.

In addition to the manual pages and info pages that you have already seen, your
Linux system probably includes a lot more documentation. The customary place to
store this is in /usr/share/doc, or /usr/doc on older systems.

Internet documentation

HOWTOs
are subject-specific help, such as the Linux IPv6 HOWTO.
Guides
are longer, in-depth books, such as Introduction to Linux - A Hands on Guide.
FAQs
are Frequently Asked Questions, such as the Linux Documentation Project
(LDP) FAQ.
man pages
are help on individual commands, as you used in the previous section of this
tutorial.
Linux Gazette
is an online magazine, currently available in English, French, German,
Indonesian, Italian, Portuguese, Russian, and Spanish.

Notifying users

The first two of these, /etc/issue and /etc/issue.net, are displayed on an ASCII
terminal that is connected locally (/etc/issue) or remotely (/etc/issue.net).

Both /etc/issue and /etc/issue.net provide user feedback in the form of a logon
prompt and could also be used to advise users of issues such as impending
outages. However, this is usually done with a message of the day or motd, which is
stored in /etc/motd. The contents of /etc/motd are displayed after a successful login
but just before the login shell is started.

вторник, 30 марта 2010 г.

LPI exam 102 prep: Printing

Краткие заметки, сделанные при подготовке к сдаче экзамена LPI 117-102 (Junior Level Linux Professional (LPIC-1)).

In UNIX® and Linux systems, printing initially used the Berkeley Software
Distribution (BSD) printing subsystem, consisting of a line printer daemon (lpd)
running as a server, and client commands such as lpr to submit jobs for printing.
This protocol was later standardized by the IETF as RFC 1179, "Line Printer
Daemon Protocol".

System V UNIX also had a printing daemon. It was functionally similar to the
Berkeley LPD, but had a different command set. You will frequently see two
commands with different options that accomplish the same task. For example, lpr
from the Berkeley implementation and lp from the System V implementation are
both use to print files.


The CUPS server runs as a daemon process, cupsd under control of a configuration
file normally located in /etc/cups/cupsd.conf. The /etc/cups directory also contains
other configuration files related to CUPS. It is usually started during system
initialization, but may be controlled by the cups script located in /etc/rc.d/init.d or
/etc/init.d, according to your distribution.

The configuration file, /etc/cups/cupsd.conf, contains parameters that you may set to
control such things as access to the printing system, whether remote printing is
allowed, the location of spool files, and so on.

the spool files are stored by default in the /var/spool filesystem as you would expect from the
Filesystem Hierarchy Standard (FHS).

the spool files are stored by default in the /var/spool filesystem as you would expect from the
Filesystem Hierarchy Standard (FHS).

check the queues known to the system using the CUPS lpstat command.

-a Display accepting
status of printers.
-c Display print classes.
-p Display print status:
enabled or disabled.
-s Display default printer,
printers, and classes.
Equivalent to -d -c
-v. Note that multiple
options must be
separated as values
can be specified for
many.
-s Display printers and
their devices.

also use the LPD lpc command, found in /usr/sbin, with the status option.

If no option is specified, lpq displays the queue for the default printer. Use the -P option with a printer name to specify a particular printer or the -a option to specify all printers,

You can avoid printing the extra copy by removing a job from the queue with the lprm command.

Another command that will help you manipulate jobs on print queues is the lp command.

you might use lpc topq to move a job to the top of a queue. Other lpc commands may include
disable, down, enable, hold, move, redirect, release, and start.

Most CUPS systems also have a graphical interface to
the command-line functions that we discuss here. Generally, this interface is
accessible from the local host using a browser pointed to port 631
(http://localhost:631 or http://127.0.0.1:631),

The simplest way to print any file is to use the lpr command and provide the file
name. This prints the file on the default printer.

Print files

The simplest way to print any file is to use the lpr command and provide the file
name. This prints the file on the default printer.

-C, -J, or -T Set a job name.
-P Select a particular
printer.
-# Specify number of
copies. Note this is
different to the -n option
you saw with the lp
command.
-m Send email upon job
completion.
-l The print file is already
formatted for printing.
Equivalent to -o raw.
-o Set a job option.
-p Format a text file with a
shaded header.
Equivalent to -o
prettyprint.
-q Hold (or queue) the job
for later printing.
-r Remove the file after it

complex example: lpr -Pxerox -J "Ian's text file" -#2 -m -p -q -r abc.txt, user ian is requesting a specific printer, giving a name to the
job, requesting 2 copies, requesting an email confirmation after printing, holding the
job, and having the file abc.txt removed after it has been spooled. The subsequent
commands show the held job and the fact that the file has indeed been removed.

find out what general options are set for a printer using the
lpoptions command. Add the -l option to display printer-specific options

mpage
Formats test files for printing multiple pages on a single page.
psnup
Performs similar functions for PostScript files as mpage does for text files.
psbook
Rearranges the pages of a PostScript document for printing as a book or
booklet, taking into account the number of pages per sheet and how the sheet
is folded.

The a2ps command can handle a wide range of text file types and make intelligent
decisions about the best way to format them

Printer installation and configuration

Use the cups script located in /etc/rc.d/init.d or /etc/init.d, according to your
distribution with the status command. You can also use the lpstat or lpc
status command to check whether your daemon is running.

CUPS also maintains an access log and an error log. You can change the level of
logging using the LogLevel statement in /etc/cups/cupsd.conf. By default, logs are
stored in the /var/log/cups directory.

The lpinfo command can also help you identify
available device types and drivers. Use the -v option to list supported devices and
the -m option to list drivers

If you need to remove a printer, use lpadmin with the -x option

CUPS uses the /var/spool/cups directory for spooling.

понедельник, 29 марта 2010 г.

LPI exam 102 prep: Boot, initialization, shutdown, and runlevels

Краткие заметки, сделанные при подготовке к сдаче экзамена LPI 117-102 (Junior Level Linux Professional (LPIC-1)).

Boot the system

To summarize the boot process for PCs:
1. When a PC is turned on, the BIOS (Basic Input Output Service) performs
a self test.
2. When the machine passes its self test, the BIOS loads the Master Boot
Record (or MBR, usually from the first 512-byte sector of the boot drive).
This is usually the first hard drive on the system, but may also be a
diskette, CD, or USB key.
3. For a hard drive, the MBR loads a stage 1 boot loader, which is typically
either the LILO or GRUB stage1 boot loader on a Linux system. This is
another 512-byte, single-sector record.
4. The stage 1 boot loader usually loads a sequence of records called the
stage 2 boot loader (or sometimes the stage 1.5 loader).
5. The stage 2 loader loads the operating system. For Linux, this is the
kernel, and possibly an initial RAM disk (initrd).

The LILO configuration file defaults to /etc/lilo.conf.

Remember that whenever you make changes to /etc/lilo.conf, or whenever you
install a new kernel, you must run lilo

In addition to displaying the LILO configuration file, you may use the -q option of the
lilo command to display information about the LILO boot choices. Add -v options
for more verbose output.

The GRUB configuration file defaults to /boot/grub/grub.conf or /boot/grub/menu.lst.
If both are present, one will usually be a symbolic link to the other.

GRUB also does not require a partition to be mounted in order to configure a boot
entry for it. You will notice entries such as root (hd0,6) and
splashimage=(hd0,2)/boot/grub/fig1x.xpm.gz. GRUB refers to your hard
disks as hdn, where n is an integer starting from 0. Similarly, partitions on a disk are
similarly numbered starting from 0.

From the menu, you may press e on an entry to edit it, c to switch to a GRUB command line,
b to boot the system, p to enter a password, and Esc to return to the menu or to the
previous step. There is also a grub command, which creates a simulated shell in
which you may test your GRUB configuration or your GRUB command skills.

You may also view it on your system using the info grub command.

With GRUB, you could type in another set of commands for the kernel and initrd
statements, or, preferably, you could use the edit facility that you just learned about
to edit an existing entry by adding -prep to the end of the existing kernel image
name.

When the kernel finishes loading, it usually starts /sbin/init. This program
remains running until the system is shut down. It is always assigned process ID 1

The init program boots the rest of your system by running a series of scripts.
These scripts typically live in /etc/rc.d/init.d or /etc/init.d, and they perform services
such as setting the system's hostname, checking the filesystem for errors, mounting
additional filesystems, enabling networking, starting print services, and so on. When
the scripts complete, init starts a program calledgetty, which displays the login
prompt on consoles.

It's nice to be able to go back and review the kernel messages. Since standard
output is related to a process, and the kernel does not have a process identifier, it
keeps kernel (and module) output messages in the kernel ring buffer. You may
display the kernel ring buffer using the dmesg command, which displays these
messages on standard output.

Once your system has started to the point of running /sbin/init, the kernel still
logs events in the ring buffer as you just saw, but processes use the syslog daemon
to log messages, usually in /var/log/messages.

Runlevels , shutdown, and reboot

Runlevels define what tasks can be accomplished in the current state (or runlevel) of
a Linux system. Every Linux system supports three basic runlevels, plus one or
more runlevels for normal operation.

0 Shut down (or halt) the system
1 Single-user mode; usually aliased as s or S
6 Reboot the system

2 Multi-user mode without networking
3 Multi-user mode with networking
5 Multi-user mode with networking and the

To make a permanent change, you can edit /etc/inittab and change the default level
You can use the telinit command to tell the init process what runlevel it should switch to.

You can determine the current runlevel using the runlevel command, which
shows the previous runlevel as well as the current one.

f you use the ls command to display a long listing of the telinit command, you
will see that it really is a symbolic link to the init command. The init executable
knows which way it was called and behaves accordingly. Since init normally runs
as PID 1, it is also smart enough to know if you invoke it using init rather than
telinit. If you do, it will assume you want it to behave as if you had called
telinit instead. For example, you may use int 5 instead of telinit 5 to
switch to runlevel 5.

The shutdown command sends a warning message to all logged on users and blocks further logins.
It then signals init to switch runlevels. The init process then sends all running
processes a SIGTERM signal, giving them a chance to save data or otherwise
properly terminate. After 5 seconds, or another delay if specified, init sends a
SIGKILL signal to forcibly end each remaining process.

By default, shutdown switches to runlevel 1 (single-user mode). You may specify
the -h option to halt the system, or the -r option to reboot. A standard message is
issued in addition to any message you specify. The time may be specified as an
absolute time in hh:mm format, or as a relative time, n, where n is the number of
minutes until shutdown. For immediate shutdown, use now, which is equivalent to
+0.

If you have issued a delayed shutdown and the time has not yet expired, you may
cancel the shutdown by pressing Ctrl-c if the command is running in the foreground,
or by issuing shutdown with the -c option to cancel a pending shutdown.

The halt command halts the system.
The poweroff command is a symbolic link to the halt command, which
halts the system and then attempts to power it off.
The reboot command is a another symbolic link to the halt command,
which halts the system and then reboots it.

there are several other fields in /etc/inittab, along with a set
of init scripts in directories such as rc1.d or rc5.d, where the digit identifies the
runlevel to which the scripts in that directory apply

The scripts used by init when starting the system, changing runlevels, or shutting
down are typically stored in the /etc/init.d o r/etc/rc.d.init.d directory. A series of
symbolic links in the rcn.d directories, one directory for each runlevel n, control
whether a script is started when entering a runlevel or stopped when leaving it.
These links start with either a K or an S, followed by a two-digit number and then the
name of the service.

воскресенье, 28 марта 2010 г.

LPI exam 102 prep: Kernel

Краткие заметки, сделанные при подготовке к сдаче экзамена LPI 117-102 (Junior Level Linux Professional (LPIC-1)).


Runtime kernel management


The uname command prints information about your system and its kernel.

-s Print the kernel name. This is the default if no option is specified.
-n Print the nodename or hostname.
-r Print the release of the kernel. This option is often used with module-handling commands.
-v Print the version of the kernel.
-m Print the machine's hardware (CPU) name.
-o Print the operating system name.


Use the lsmod command to display the modules that are currently loaded on your
system.

In addition to the module name, lsmod also shows the module size and the number
of users of the module. If the module is used by any other modules, these are listed.

The modinfo command displays information about one or more modules.

On 2.6 kernels you can also use modinfo to limit requests to specific information
about a module. Use the -F option to extract a single information type, such as
parm, description, license, filename, or alias.

To remove a mod, use the rmmod command along with the module name

insmod command, which takes the full path name of the module to be reloaded,
along with any module options that may be required

The modprobe command provides a higher-level interface that
operates with the module name instead of file path. It also handles loading additional
modules upon which a module depends, and can remove modules as well as load
them.

The depmod command scans the modules in the subdirectories of /lib/modules for
the kernel you are working on and freshens the dependency information.

You can customize the behavior of modprobe and depmod using the configuration
file /etc/modules.conf.

Customize and build kernels and kernel modules

The ultimate source for the Linux kernel is the Linux Kernel Archives
The compressed source is normally uncompressed in /usr/src, and it creates a new subdirectory for the kernel version, such as linux-2.6.15, containing the tree of files
needed to build your kernel.

The .config file in your kernel build directory contains configuration information for
your kernel, including the target machine environment, the features to be included,
and whether a feature should be compiled into the kernel or built as a module.
Creating a .config file is the first step to building or rebuilding a kernel.

If you are not sure of the state of your build tree, run make clean before
configuring your new kernel. For an even more extreme cleanup target, run make
mrproper; this will remove your .config file as well as some other files used by the
build process. If you do this and then need to restore a backed up .config file, you
will need to run make oldconfig before configuring.

When you have completed building your kernel, you still have a couple of steps to
go. First, you need to run make modules_install to install your kernel modules
in a new subdirectory of ./lib/modules.

Finally, you need to run make install to install the new kernel and initial RAM
disk in /boot and update your boot loader configuration.

вторник, 9 марта 2010 г.

Заметки к экзамену LPI 101

Краткие заметки, сделанные при подготовке к сдаче экзамена LPI 117-101 (Junior Level Linux Professional (LPIC-1)).

Путь к новому набору библиотек следует прописывать в файле ld.so.conf.

Сигнал, посылаемый командой kill без параметров является 15 или SIGTERM.

Для активации групповой квоты в файле /etc/fstab следует добавить параметр grpquota.

Для активации персональной квоты в файле /etc/fstab следует добавить параметр usrquota.

Для рекурсивного создания новых директорий с командой mkdir следует использовать параметр –p.

Параметры, передаваемые от bootloader к ядру отражаются списком в файле /proc/cmdline.

Для отображения частично установленных пакетов и получения советов по их полной установке следует использовать команду dpkg –C.

Переменная окружения, куда следует заносить нестандартные места нахождения библиотек, называется LD_LIBRARY_PATH.

После обновления зависимостей и перед компиляцией двоичного файла следует запустить команду make clean.

Для выяснения названия пакета, из которого был установлен определенный путь, следует использовать команду rpm –qf /etc/path.

Источники для установки программ в Debian находятся в файле /etc/apt/sources.list.

Вывести список всех файлов, установленных из пакета можно командой rpm –qlp program.rpm.

Установленные пакеты Debian можно опрашивать командами dpkg и dselect.

Для возвращения к старой версии устанавливаемого пакета следует использовать параметр –oldpackage.

На разных разделах следует размещать /home ,/var, /tmp.

Консорциум, выпускающий модемы для Linux носит название ACM.

Для совместимости устройства с Linux не обязательно обеспечивать его совместимость с стандартом USB 2.0.

Для настройки свойств звуковой карты на устройствах ALSA следует использовать программу alsactl.

Для отсылки определенного сигнала программе следует использовать команду killall –s SIGUSR1 apache2.

Сочетание клавиш Ctrl-C отсылает сигнал 2 SIGINT.

Для замены символа возврата каретки CF-CL на стандартный для Linux CF следует использовать команду tr –d '\r’ <> newtext.

Для нахождения слова в тексте без учета регистра этого слова следует использовать команду grep –i word.

Команда echo $! отобразит последнюю выполненную в фоне команду.

Для запуска в фоне остановленной программы следует выполнить команду continue myapp.

Для форматирования текста на экране следует использовать команду col.

Для просмотра деталей дисковой квоты надо использовать команду repquota.

Использование inode на каждой файловой системе можно отобразить при помощи команды df –i.

После установки новой программы обновить кэш библиотек ld.so.cache можно при помощи команды ldconfig.

Список файлов, установленных из пакета можно получить при помощи команды dpkg –L program.pkg.

Частые записи проходят в директорию /tmp, ее устанавливают в отдельный раздел во избежании переполнения основного диска.

Логи от ядра пишутся в директорию /var/log/messages.

Для отключения пользователей от системы и запуска программы можно использовать программу telinit 1.

Файловая система USB находится по адресу /proc/bus/usb.

Для создания области подкачки на диске следует выполнить команду mkswap.

Для конфигурирования приложений заново следует использовать программу dpkg-reconfigure.

При установки grub с указанием параметра –root-directory /custom-grub программа будет установлена по адресу /custom-grub/boot/grub.

Для определения пути к библиотекам надо выполнить команду ldd /usr/lib/libpng12.so.

Аналогом команды cat <> file2 является команда cat file1 > file2.

Для просмотра списка изменений устанавливаемой программы следует запустить команду rpm –q –changelog rpmpachage.

Для отключения квоты для директории (например /progs)следует использовать команду quotaoff –gv /progs.

Для отображения специфических колонок из файла следует использовать команду cut –d; -f 1,3 /etc/passwd.

Для назначения расширенных прав доступа к файлу следует использовать программу setfacl –m user:sally:rw /etc/filename.

пятница, 25 декабря 2009 г.

LPI exam 101 prep: GNU and UNIX commands

В рамках подготовки к сдаче экзамена 101 уровня Junior Level Linux Professional LPIC-1 публикую краткие описания команд и фактов из подготовительных материалов IBM к этому экзамену.

Using the command line

Shells also use three standard I/O streams:
• stdin is the standard input stream, which provides input to commands.
• stdout is the standard output stream, which displays output from
commands.
• stderr is the standard error stream, which displays error output from
commands.

echo command prints (or echos) its arguments to the terminal

all the extra spaces were compressed down to single
spaces in the output. To avoid this, you need to quote strings, using either double
quotes (") or single quotes (').

Normally echo will append a trailing
new line character to the output. Use the -n option to suppress this. Use the -e
option to enable certain backslash escaped characters to have special meaning.

When the backslash
character (\) is not quoted, it serves as an escape to signal bash itself to preserve
the literal meaning of the following character.

The simplest command sequence is just two commands separated by a semicolon
(;). Each command is executed in sequence. In any programmable environment,
commands return an indication of success or failure; Linux commands usually return
a zero value for success and a non-zero in the event of failure. You can introduce
some conditional processing into your list using the && and || control operators. If
you separate two commands with the control operator && then the second is
executed if and only if the first returns an exit value of zero. If you separate the
commands with ||, then the second one is executed only if the first one returns a
non-zero exit code.

You can terminate a shell using the exit command.

Some common bash environment variables

USER The name of the logged-in user
UID The numeric user id of the logged-in user
HOME The user's home directory
PWD The current working directory
SHELL The name of the shell
$ The process id (or PIDof the running bash shell (or other)
process
PPID The process id of the process that started this process (that is, the id
of the parent process)
? The exit code of the last command

[ian@echidna ian]$ echo $USER $UID
ian 500
[ian@echidna ian]$ echo $SHELL $HOME $PWD
/bin/bash /home/ian /home/ian

use the export command to export a variable name.

Sometimes you need to use variables in expressions where the meaning is ambiguous. In such cases, you can use curly braces to delineate a variable name

[ian@echidna ian]$ echo "-$HOME/abc-"
-/home/ian/abc-

The env command without any options or parameters displays the current environment variables.

use the unset command to unset a variable and remove it from the shell variable list

use the set command to control many facets of the way bash (or other shells) work

use the exec command to run another program that replaces the current shell.

history
Displays the entire history
history N
Displays the last N lines of your history
history -d N
Deletes line N form your history; you might do this if the line contains a
password, for example
!!
Your most recent command
!N
The Nth history command
!-N
The command that is N commands back in the history (!-1 is equivalent to !!)
!#
The current command you are typing
!string
The most recent command that starts with string

Emacs keystroke combinations are usually expressed as C-x or M-x,
where x is a regular key and C and M are the Control and Meta keys, respectively.
On a typical PC system, the Ctrl key serves as the Emacs Control key, and the Alt
key serves as the Meta key.

If you use cd with no parameters, the change
will be to your home directory. A single hyphen (-) as a parameter means to change
to the previous working directory. Your home directory is stored in the HOME
environment variable, and the previous directory is stored in the OLDPWD variable,
so cd alone is equivalent to cd $HOME and cd - is equivalent to cd $OLDPWD.
Usually we say change directory instead of the full change current working directory.

The primary (and traditional) source of documentation is the manual pages, which
you can access using the man command.

The common manual sections, with some example contents
are:
1. User commands (env, ls, echo, mkdir, tty)
2. System calls or kernel functions (link, sethostname, mkdir)
3. Library routines (acosh, asctime, btree, locale, XML::Parser)
4. Device related information (isdn_audio, mouse, tty, zero)
5. File format descriptions (keymaps, motd, wvdial.conf)
6. Games (note that many games are now graphical and have graphical
help outside the man page system)
7. Miscellaneous (arp, boot, regex, unix utf8)
8. System administration (debugfs, fdisk, fsck, mount, renice, rpm)

Two important commands related to man are whatis and apropos. The whatis
command searches man pages for the name you give and displays the name
information from the appropriate manual pages. The apropos command does a
keyword search of manual pages and lists ones containing your keyword.

If you wish to print the page, specify the -t option to format the page for printing using the groff or troff program.

In addition to manual pages accessible from a command line, the Free Software
Foundation has created a number of info files that are processed with the info
program.

Section 3. Text streams and filters

In order to use the output of a command, command1, as input to a filter, command2, you connect the commands using the pipe operator (|)

output redirection operator (>). output does not display on the terminal because it has been
redirected to the file.

Use the cat (short for catenate) command to display the contents of a file on stdout.

Occasionally, you might want to display a file in reverse order. Naturally, there is a
text filter for that too, called tac (reverse of cat).

GNU text utilities include an od (or Octal Dump)

The split command will do this in such a way that the cat command can be used to recreate the file easily. By default, the files resulting from the split command have a prefix in their name of 'x' followed by
a suffix of 'aa', 'ab', 'ac', ..., 'ba', 'bb', etc.

The wc command displays the number of lines, words, and bytes in a file.

Options allow you to control the output from wc or to display other information such as maximum line length.

Two commands allow you to display either the first part (head) or last part (tail).

Another common use of tail is to follow a file using the -f option, usually with a line count of 1.

Sometimes you may want to swap tabs for spaces or vice versa. The expand and
unexpand commands do this. The -t option to both commands allows you to set
the tab stops.

Use the tr command, which translates characters in one set (set1) to corresponding characters in another set (set2).

The nl command numbers lines, which can be convenient when printing files.

The pr command is used to format files for printing. The default header includes the
file name and file creation date and time, along with a page number and two lines of
blank footer.

Useful command for formatting text is the fmt command, which formats text
so it fits within margins.

The sort command sorts the input using the collating sequence for the locale
(LC_COLLATE) of the system The sort command can also merge already sorted
files and check whether a file is sorted or not.

The uniq command normally operates on sorted files, but remove consecutive identical
lines from any file, whether sorted or not.

the cut command, which extracts fields from text files.

The paste command pastes lines from two or more files side-by-side, similar to the way that the pr command merges files using its -m option.

join, which joins files based on a matching field. The files should be sorted on the join field

Sed is the stream editor. Sed is extremely powerful, and the tasks it can accomplish are limited only by your imagination. sed can work as a
filter or take its input from a file. Output is to the standard output stream. Sed loads
lines from the input into the pattern space, applies sed editing commands to the
contents of the pattern space, and then writes the pattern space to standard output.

Section 4. Basic file management

On a storage device, a file or directory is contained in a collection of blocks.
Information about a file is contained in an inode which records information such as
the owner, when the file was last accessed, how large it is, whether it is a directory
or not, and who can read or write it. The inode number is also known as the file
serial number and is unique within a particular filesystem

use ls -ld and also how to list entries for multiple files or directories.

ls -t will sort by modification time (newest to oldest) while ls
-lS will produce a long listing sorted by size (largest to smallest). Adding -r will
reverse the sort order. for example, use ls -lrt to produce a long listing sorted
from oldest to newest.

cp
is used to make a copy of one or more files. You must give at least two names,
one (or more source names and one target name. If you specify two file names,
then the first is copied to the second. Either source or target file name may
include a path specification. If you specify a directory as the last name, then
you may specify multiple files to be copied into it. All files will be copied from
their existing locations and the copies will have the same file names as the as
the original files. Note that there is no default assumption of the target being
the current directory as in DOS and Windows operating systems.

mv
is used to move or rename one or more files or directories. In general, the
names you may use follow the same rules as for copying with cp; you can
rename a single file or move a set of files into a new directory. Since the name
is only a directory entry that links to an inode, it should be no surprise that the
inode number does not change unless the file is moved to another filesystem,
in which case moving it behaves more like a copy followed by deleting the
original.

rm
is used to remove one or more files. We will see how to remove directories
shortly.

-f or --force
will cause cp to attempt to remove an existing target file even if it is not
writable.
-i or --interactive
will ask for confirmation before attempting to replace and existing file
-b or --backup
will make a backup of any files that would be replaced.

rm command also accepts the -i (interactive) and -f (force options.
Once you remove a file using rm, the filesystem no longer has access to it.

The -p option may be used to preserve selected attributes.

The mkdir, like the commands we have just been reviewing, will handle
multiple directory creation requests in one pass

Removing directories using the rmdir command is the opposite of creating them.
Again, there is a -p option to remove parents as well.

You can use the -r (or -R or --recursive) option to cause the cp command to
descend into source directories and copy the contents recursively.

A string containing any of the characters '?', '*' or '[', is a wildcard pattern. Globbing is
the process by which the shell (or possibly another program) expands these patterns
into a list of pathnames matching the pattern. The matching is done as follows.
?
matches any single character.
*
matches any string, including an empty string.
[
introduces a character class. A character class is a non-empty string,
terminated by a ']'. A match means matching any single character enclosed by
the brackets.


• The '*' and '?' characters match themselves. If you use these in filenames,
you will need to be really careful about appropriate quoting or escaping.
• Since the string must be non-empty and terminated by ']', you must put ']'
first in the string if you want to match it.
• The '-' character between two others represents a range which includes
the two other characters and all between in the collating sequence. For
example, [0-9a-fA-F] represents any upper or lower case hexadecimal
digit. You can match a '-' by putting it either first or last within a range.
• The '!' character specified as the first character of a range complements
the range so that it matches any character except the remaining
characters. For example [!0-9] means any character except the digits 0
through 9. A '!' in any position other than the first matches itself.
Remember that '!' is also used with the shell history function, so you need
to be careful to properly escape it.

the touch command which can update file access and modification times or create empty files.

find command which is used to find files in one or more directory trees, based on criteria such as name, timestamp, or size.

The -exec option can be used for as many purposes as your imagination can
dream up. For example:
find . -empty -exec rm '{}' \;
removes all the empty files in a directory tree, while
find . -name "*.htm" -exec mv '{}' '{}l' \;
renames all .htm file to .html files.

Section 5. Streams, pipes, and redirects

There are two ways to redirect output:
n>
redirects output from file descriptor n to a file. You must have write authority to
the file. If the file does not exist, it is created. If it does exist, the existing
contents are usually lost without any warning.
n>>
also redirects output from file descriptor n to a file. Again, you must have write
authority to the file. If the file does not exist, it is created. If it does exist, the
output is appended to the existing file.

Use &> or &>> to redirect both standard output and standard
error to the same place.

At other times you may want to ignore either standard output or standard error
entirely. To do this, redirect the appropriate stream to /dev/null.

we can redirect the stdout and stderr streams, so too we can redirect stdin
from a file, using the < operator.


Shells, including bash, also have the concept of a here-document, which is another
form of input redirection. This uses the << style="font-weight: bold;">| (pipe) operator between two commands to direct the stdout of the first to the stdin of the second.

The xargs command works a little like the -exec option of find, but there are some
important differences

Section 6. Create, monitor, and kill processes

the ps command which displayed process status and we saw that processes have a
Process ID (PID) and a Parent Process id (PPID)

What you need to do is place the job in the background; a bg command takes the same type of job specification as the fg command and does exactly that.

job 2 has a plus sign (+) beside the job number, indicating that it is the
current job.

The nohup command is used to start a command that will ignore hangup signals
and will append stdout and stderr to a file.

If we use the jobs command with the -p option, the
output is simply the PID of the process group leader for each job.

If you run ps several times in a row, to see what is changing, you probably need the
top command instead.

The general way to send a signal is with the kill command.

Section 7. Process execution priorities

The nice command displays our default priority.

If you happen to start a process and realize that it should run at a different priority, there is a way to change it after it has started, using the renice command.

Section 8. Searching with regular expressions

A regular expression (also called a "regex" or "regexp") is a way of describing a text
string or pattern so that a program can match the pattern against arbitrary text
strings, providing an extremely powerful search capability.

Most characters match themselves, and most metacharacters must
be escaped using a backslash (\).

+
The + operator is like the * operator, except that it matches one or more
occurrences of the preceding regular expression. It must be escaped for basic
expressions.
?
The ? indicates that the preceding expression is optional, so it represents zero
or one occurrences of it. This is not the same as the ? used in globbing.
.
The . (dot) is a metacharacter that stands for any character. One of the most
commonly used patterns is .*, which matches an arbitrary length string
containing any characters (or no characters at all). Needless to say, you will
find this used as part of a longer expression. Compare a single dot with the ?
used in globbing and .* with the * used in globbing.

The ^ (caret) matches the beginning of a line while the $ (dollar sign) matches the
end of line. So ^..b matches any two characters at the beginning of a line followed
by a b, while ar$ matches any line ending in ar. The regular expression ^$ matches
an empty line.

Range expression
A range expression is two characters separated by a - (hyphen), such as 0-9
for digits, or 0-9a-fA-F for hexadecimal digits. Note that ranges are
locale-dependent.
Named classes
Several named classes provide a convenient shorthand for commonly used
classes. Named classes open with [: and close with :]. Some examples:
[:alnum:]
Alphanumeric characters
[:blank:]
Space and tab characters
[:digit:]
The digits 0 through 9 (equivalent to 0-9)
`[:upper:] and [:lower:]
Upper and lower case letters respectively.
^ (negation)
When used as the first character in a square brackets, the ^ (caret) negates the
sense of the remaining characters so the match

Section 9. File editing with vi

vi modes
The vi editor has two modes of operation:
Command mode
In command mode, you move around the file and perform editing operations
such as searching for text, deleting text, changing text, and so on. You usually
start in command mode.
Insert mode
In insert mode, you type new text into the file at the insertion point. To return to
command mode, press the Esc (Escape) key.

:q!
Quit editing the file and abandon all changes. This is a very common idiom for
getting out of trouble.
:w!
Write the file (whether modified or not). Attempt to overwrite existing files or
read-only or other unwriteable files. You may give a filename as a parameter,
and that file will be written instead of the one your started with. It's generally
safer to omit the ! unless you know what you're doing here.
ZZ
Write the file if it has been modified. Then exit. This is a very common idiom for
normal vi exit.
:e!
Edit the current disk copy of the file. This will reload the file, abandoning
changes you have made. You may also use this if the disk copy has changed
for some other reason and you want the latest version.
:!
Run a shell command. Type the command and press Enter. When the
command completes, you will see the output and a prompt to return to vi
editing.

Moving around
The following commands help you move around in a file:
h
Move left one character on the current line
j
Move down to the next line
k
Move up to the previous line
l
Move right one character on the current line
w
Move to the next word on the current line
e
Move to the next end of word on the current line
b
Move to the previous beginning of the word on the current line
Ctrl-f
Scroll forward one page
Ctrl-b
Scroll backward one page

Moving to lines
The following commands help you move to specific lines in your file:
G
Moves to a specific line in your file. For example, 3G moves to line 3. With no
parameter, G moves to the last line of the file.
H
Moves relative to the top line on the screen. For example, 3H moves to the line
currently 3rd from the top of your screen.
L
Is like H, except that movement is relative to the last line on screen, Thus, 2L
moves to the second to last line on your screen.
Searching
You can search for text in your file using regular expressions:
/
Use / followed by a regular expression to search forward in your file.
?
Use ? followed by a regular expression to search backward in your file.
n
Use n to repeat the last search in either direction.

i
Enter insert mode before the character at the current position. Type your text
and press Esc to return to command mode. Use I to insert at the beginning of
the current line.
a
Enter insert mode after the character at the current position. Type your text and
press Esc to return to command mode. Use A to insert at the end of the current
line.
c
Use c to change the current character and enter insert mode to type
replacement characters.
o
Open a new line for text insertion below the current line. Use O to open a line
above the current line.
cw
Delete the remainder of the current word and enter insert mode to replace it.
Use a repetition count to replace multiple words. Use c$ to replace to end of
line.
dw
As for cw (and c$) above, except that insert mode is not entered.
dd
Delete the current line. Use a repetition count to delete multiple lines.
x
Delete the character at the cursor position. Use a repetition count to delete
multiple characters.
p
Put the last deleted text after the current character. Use P to put it before the
current character.
xp
This combination of x and p is a useful idiom. This swaps the character at the
cursor position with the one on its right.